
Let’s be real for a second. You’re sitting in that ultrasound room, staring at the monitor, and all you see is what looks like a snowstorm with some random white blobs floating around. Meanwhile, the sonographer is going “oh look, there’s the nose” and you’re thinking “where? I don’t see anything that looks like a nose.”
Yeah, I’ve been there. Multiple times, actually. With my first pregnancy, I spent half the anatomy scan pretending I could see what the tech was pointing at while secretly wondering if everyone else was just better at this than me. Spoiler alert – they’re not. Reading ultrasound images is a learned skill, and once you know what you’re looking for, those grainy black and white pictures start making a whole lot more sense.
So let me break down exactly what you’re seeing on that screen and how to actually identify your baby instead of just nodding along and hoping for the best.
Understanding the basics of ultrasound imaging
Before we get into identifying specific body parts, you gotta understand how ultrasound technology actually works. This isn’t like looking at a regular photograph where everything’s obvious.
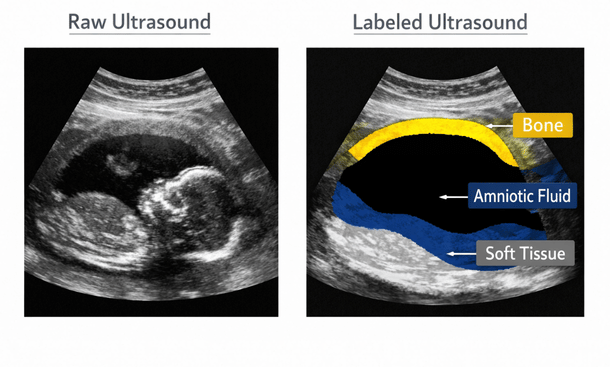
Ultrasound uses high-frequency sound waves that bounce off different tissues in your body. Dense tissues like bone reflect more sound waves back, so they appear bright white on the screen. Fluid doesn’t reflect sound waves much at all, so it shows up black. Everything else falls somewhere in between, creating those various shades of gray.
That’s why your baby’s bones – skull, spine, limbs – show up as bright white lines and curves. The amniotic fluid surrounding your baby appears completely black. Your baby’s soft tissues like organs and muscle show up in different shades of gray depending on their density.
The black areas aren’t empty space, even though they look like it. That’s fluid, which is actually a good thing. You want to see that black around your baby – it’s the amniotic fluid keeping them cushioned and protected.
What you’re looking at in first trimester scans
Early ultrasounds are the hardest to interpret because your baby is so tiny. At 6 or 7 weeks, we’re talking about something the size of a blueberry trying to show up on a screen.
The first thing you’ll see is the gestational sac – a round or oval black circle. That’s the fluid-filled sac where your baby’s developing. Inside that, you might see a smaller circle called the yolk sac, which looks like a little ring. The yolk sac is feeding your baby before the placenta takes over.
Your actual baby shows up as a small white curve or blob inside the gestational sac. They call it the fetal pole at this stage, which is just a fancy way of saying “that’s your baby but they don’t look like much yet.”
The most exciting part of early ultrasounds is seeing the heartbeat. It shows up as a flickering or pulsing movement in that tiny fetal pole. On the screen, it might not look like much, but that little flicker is your baby’s heart beating away at like 150 beats per minute.
By about 12 or 13 weeks, your baby actually starts looking human-shaped. You can usually see the head as a larger round area, and sometimes you can make out the body and limbs, though they’re still pretty small.
Identifying your baby’s profile and face
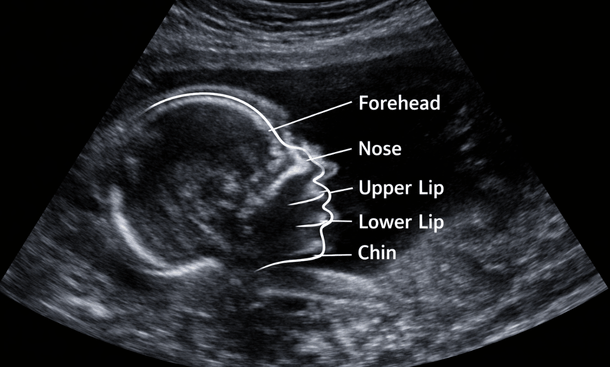
The profile view is usually the easiest angle to recognize because it actually looks like a baby. You’ll see the rounded curve of the forehead, the little nose, sometimes an open mouth, and the chin.
Here’s the trick – look for the bright white line of the skull first. Follow that curve and you’ll find where the face should be. The nose sticks out slightly from the face, and you might see the nasal bone as a small bright line. The lips sometimes show up as a slightly darker line.
If your baby’s facing the transducer straight on, you might see both eye sockets as two dark circles, kind of like a skull. Don’t freak out – it’s just the angle and the fact that eye tissue doesn’t reflect ultrasound waves well.
Later in pregnancy, especially with 3D ultrasounds, you can sometimes see your baby’s expressions. They might look like they’re yawning, sucking their thumb, or making faces. It’s pretty wild when you catch them at the right moment.
Perfect Fetal Profile
Finding the head, spine, and body
The head is usually the easiest part to identify because it’s the biggest rounded structure you’ll see, and the skull shows up bright white. In the second and third trimesters, you can often see the brain structures inside the head as different shades of gray.
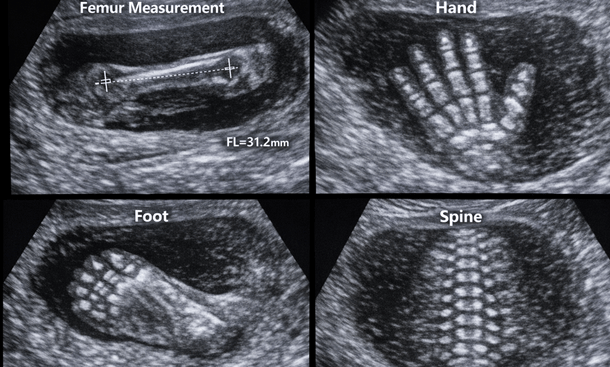
The spine is one of my favorite things to spot on ultrasounds because it’s so distinctive once you know what you’re looking for. It shows up as a row of bright white dots or dashes running down your baby’s back. Each little bright spot is a vertebra. Sometimes you see it from the side as a curved line, other times from behind as two parallel rows of dots.
The ribcage looks like a bunch of thin curved white lines surrounding the chest area. You usually see it better from certain angles than others.
The body itself appears as various shades of gray. The organs inside – heart, stomach, bladder, kidneys – each have their own appearance. The stomach might show up as a small dark circle because it contains fluid. The bladder looks similar. The heart is more complex, with chambers that the sonographer can measure and evaluate.
Spotting arms, legs, hands, and feet
Limbs show up as long white bones with gray soft tissue around them. The femur (thigh bone) is usually the easiest to see because it’s the longest and straightest bone. It looks like a bright white line.
Arms are trickier because they’re smaller and babies tend to keep them bent up near their face. You might see the humerus (upper arm bone) and the forearm bones as separate white lines.
Hands and feet are amazing when you can see them clearly. The individual finger bones and toe bones show up as tiny white lines. Sometimes you’ll catch your baby with their hand open, fingers spread, and you can count all five. Other times they’re in a fist.
Feet often show up in profile, and you can see all the little toe bones lined up. The heel bone is usually pretty obvious as a larger bright white curve at the back of the foot.
Don’t be surprised if you can’t see all the fingers and toes during your scan. Babies move constantly, and they’re often in positions where their hands and feet are hidden or curled up. The sonographer has ways to get better angles, but sometimes your baby just isn’t cooperating.
Understanding what the measurements mean
During your ultrasound, you’ll notice the sonographer keeps freezing the image and placing little crosses or plus signs on the screen. Those are measurement calipers, and they’re measuring various parts of your baby.
When they measure the head, you’ll see the calipers go from one side of the skull to the other. For the abdomen, they measure around the belly. For the femur, they measure the length of the thigh bone from end to end.
These measurements get recorded and compared to growth charts to make sure your baby’s developing on track. The actual numbers might flash on the screen – things like BPD 52mm or FL 38mm. You don’t need to memorize these numbers or even really understand them in the moment. Your doctor will review everything with you and let you know if anything needs attention.
What you can look for is whether the measurements seem proportional. Is the head roughly the right size compared to the body? Are the limbs roughly similar lengths? The sonographer is checking all this, but it’s interesting to follow along if you want.
The placenta and umbilical cord
The placenta usually shows up as a gray mass attached to the wall of your uterus. It might be at the top (fundal), bottom (low-lying or previa), front (anterior), or back (posterior). The texture looks kind of grainy or speckled.
During the ultrasound, the tech will check where the placenta is located and measure its thickness. They’ll also look at its texture to make sure it appears normal and healthy. An anterior placenta can sometimes make it harder to feel your baby kick early on, but it’s totally normal.
The umbilical cord shows up as a twisted rope-like structure connecting your baby to the placenta. With color Doppler, you can see blood flow through it – usually shown in red and blue colors on the screen. The sonographer is checking to make sure the cord has three vessels (two arteries and one vein) and that blood flow looks good.
Sometimes you’ll see the cord floating around in the amniotic fluid, and occasionally you might catch your baby holding onto it or playing with it. Babies actually do this a lot in utero.
Why some ultrasounds are clearer than others
You know how sometimes you see these perfect ultrasound pictures on social media where you can see every detail, and then your ultrasound looks like a blurry mess? There are a bunch of reasons for that.
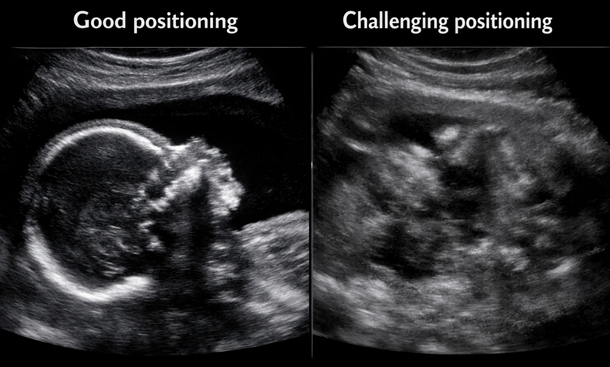
Your baby’s position matters huge. If they’re facing the right direction with a good view of their face or body, the images will be clearer. If they’re facing your spine or curled up in a weird position, good luck getting a clear shot of anything.
How far along you are affects image quality too. The sweet spot for clear images is usually around 20 to 30 weeks. Early on, everything’s too small. Late in pregnancy, your baby’s too big and squished up.
Your body composition plays a role. More tissue between the transducer and your baby means the sound waves have to travel farther, which can reduce image clarity. This isn’t anyone’s fault, it’s just physics.
The amount of amniotic fluid matters. Too little fluid means less space for clear imaging. Too much can also make things harder to see clearly.
And honestly, the skill of the sonographer and the quality of the ultrasound machine make a difference. Some techs are better at getting good angles, and newer machines produce clearer images than older ones.
What those different colors mean
Most ultrasounds you’ll see are in black, white, and shades of gray. But sometimes the sonographer will switch to color mode, and suddenly you’re seeing reds and blues on the screen.
This is Doppler ultrasound, and it’s showing blood flow. Red typically means blood flowing toward the transducer, and blue means blood flowing away from it. This isn’t about oxygenated versus deoxygenated blood – it’s purely about direction of flow.
You might see this when they’re checking the umbilical cord, looking at blood flow to the placenta, or examining your baby’s heart. The colors help them assess whether blood is moving through vessels the way it should be.
Sometimes they’ll also use power Doppler, which shows blood flow in orange or yellow colors. It’s more sensitive than regular color Doppler and can pick up slower blood flow.
Common things that look weird but are totally normal
There are some things you might see on an ultrasound that look strange or concerning but are actually completely normal. Let me save you some anxiety.
Sometimes it looks like your baby has no neck. That’s just the angle – babies in utero often have their chin tucked down.
You might see what looks like a gap or space in the skull. If the sonographer isn’t worried, it’s probably just the fontanelles – the soft spots in your baby’s skull that allow their head to mold during birth.
The stomach and bladder showing up as black circles is good. It means your baby’s swallowing amniotic fluid and their digestive and urinary systems are working.
If you see white spots in the heart or abdomen, those are often just calcium deposits called echogenic foci. They’re usually harmless and go away on their own.
Your baby might look like they’re not moving much during the scan. Don’t panic – they actually sleep a lot in there. The sonographer might try to wake them up by gently jiggling your belly or making noise.
How to get better pictures
If you want clearer ultrasound images, there are a few things that might help, though there’s no guarantee.
Stay hydrated in the days leading up to your ultrasound. Good hydration can improve amniotic fluid levels and image quality.
Try drinking some cold water or having a small snack before your appointment. This sometimes gets your baby moving into a better position.
Don’t be shy about asking the sonographer to try different angles or to wait a few minutes if your baby’s not in a great position. They want to get good images too.
If you’re getting a 3D or 4D ultrasound, schedule it for that sweet spot between 26 and 32 weeks when your baby has enough fat to fill out their features but still has room to move.
And honestly, sometimes you just need to accept that your baby isn’t feeling cooperative that day. I had one ultrasound where my daughter had her hands in front of her face the entire time, and no amount of moving, prodding, or waiting changed that. She was giving us the “talk to the hand” treatment before she was even born.
The difference between 2D, 3D, and 4D images
Regular ultrasounds are 2D – flat images showing slices or cross-sections of your baby. These are what doctors use for medical assessments because they’re the clearest for measuring and examining organs and structures.
3D ultrasounds take multiple 2D images from different angles and use computer software to construct a three-dimensional image. These show surface features like your baby’s face in more detail and dimension. They’re cool to look at, but they’re not necessarily better for medical purposes.
4D is just 3D in motion – basically a 3D video instead of a still picture. You can watch your baby move, yawn, suck their thumb in three dimensions. It’s pretty amazing technology.
Here’s the thing though – 3D and 4D images still require good positioning and adequate fluid to work well. If your baby’s face is pressed against the placenta or their hands are in the way, even fancy 3D technology can’t give you a clear view.
What to do if you can’t see what they’re pointing at
Look, there’s no shame in not being able to see what the sonographer is showing you. I’ve been there so many times. Here’s what you can do.
Just ask them to explain it again. Seriously, most sonographers are happy to walk you through it multiple times. They do this all day every day – of course they can see things you can’t.
Ask them to freeze the image and trace the outline with their finger or the cursor. Sometimes that makes it click.
Request printed pictures or ask if they can save images to give you. You can study them at home when you’re not distracted by the excitement and nervousness of the appointment.
Bring your partner or support person and see if they can spot things you’re missing. Sometimes a fresh set of eyes helps.
“And remember, the point of ultrasounds isn’t really for you to get perfect pictures, even though that’s a nice bonus. The point is for trained medical professionals to assess your baby’s development and make sure everything’s progressing normally. If they say everything looks good, then it doesn’t matter whether you could identify the nose or count the toes yourself. For everything you need to know about understanding your pregnancy ultrasound results – from interpreting measurements to knowing what questions to ask – check out our complete guide to feeling confident and informed at every appointment.
You’ll meet your baby face to face soon enough, and trust me, they’ll be way cuter in person than they are on that grainy ultrasound screen. And when you’re trying to understand all those measurements and numbers that appear on the screen during these scans, make sure you check out our guide on normal ultrasound results in pregnancy so you know what’s typical and what might need a second look.

As an author at Felyro.com, I create actionable content on pregnancy tracking, offering practical tools, tips, and insights that empower mothers-to-be to stay informed and confident throughout their pregnancy.