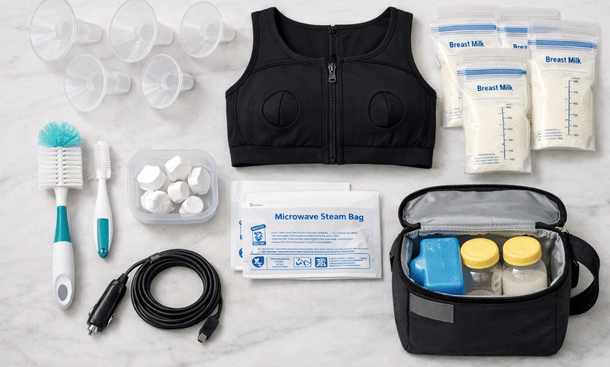
Real talk: the pump itself is just the start. If you wanna make pumpin’ less of a pain in the ass, you need the right accessories—and I’m not talkin’ about cutesy stuff that looks good on Instagram. I mean the practical gear that keeps you from losin’ your mind at 2 AM when you realize you’re outta storage bags or your last clean flange just hit the floor. From pumpin’ bras that actually hold everything in place to car adapters for those long commutes, I’m coverin’ what’s genuinely worth buyin’ and what’s a total waste of money. And hey, if you’re still decidin’ on which pump to pair all this gear with, my complete rundown of the best breast pumps this year breaks down every option so you’re set from the start.
Extra Flanges: Your Most Important Backup
Let’s start with the most critical accessory you absolutely need—extra flanges in the right sizes.
Your pump probably came with one or two sets of flanges in standard sizes, usually 24mm. That’s great until you realize you need a different size, or one of your flanges cracks, or you just don’t wanna wash pump parts at midnight because you need ’em again at 3 AM.
Buy at least one extra set of flanges in your correct size. Two extra sets is even better. This way you can rotate through them and only wash pump parts once or twice a day instead of after every single session.
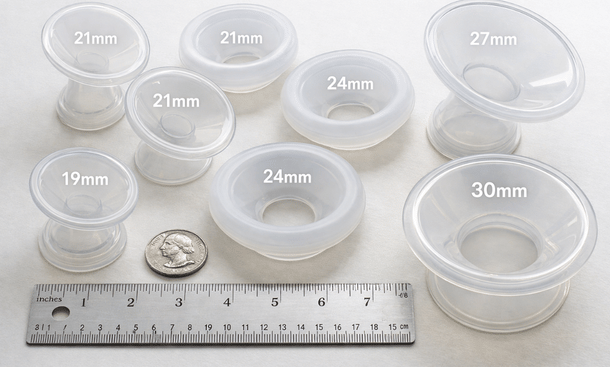
If you’re still figurin’ out your correct flange size, buy a variety pack. Most brands sell sets with multiple sizes—usually 21mm, 24mm, and 27mm. Try each one and see which gives you the best output and most comfort. Once you know your size, stock up on that specific size.
Flanges run anywhere from ten to thirty bucks per pair dependin’ on the brand. Medela and Spectra flanges are on the lower end, specialty brands like Pumpin’ Pals or BeauGen cushions are pricier but some moms swear by them for comfort.
Hard plastic flanges are standard, but silicone flanges or flange inserts are available too. The silicone feels softer and more comfortable for a lotta women. BeauGen cushions are silicone inserts that fit inside your regular flanges to make them more comfortable and help with fit. They’re about twenty bucks but lots of moms say they’re game-changers.
Make sure you’re buyin’ flanges compatible with your specific pump brand. Most brands have proprietary designs that don’t mix and match, though there are some universal adapters available.
Pumping Bras: Hands-Free Is Life-Changing
If you’re gonna be pumpin’ regularly, a hands-free pumpin’ bra is non-negotiable. Holdin’ flanges to your chest for twenty minutes multiple times a day is miserable.
Pumpin’ bras have openings or slits that hold the flanges in place against your breasts so you can let go and use your hands for somethin’ else—scrollin’ your phone, eatin’, workin’ on your laptop, whatever.
There are two main types. Pull-over style bras look like sports bras with holes or slits for the flanges. Clip or clasp style bras look more like regular nursing bras but with panels that open and close to hold flanges. Both work fine, it’s mostly personal preference.
Simple Wishes is probably the most popular brand. Their Supermom bra is around forty dollars and fits a wide range of sizes with adjustable straps and band. It’s not the prettiest thing you’ll ever wear but it works reliably.
Kindred Bravely and Dairy Fairy make pumpin’ bras that look more like actual bras and less like contraptions. They’re a bit pricier, around fifty to sixty dollars, but if you’re pumpin’ at work and want somethin’ less obviously a pumpin’ bra, they’re worth considerin’.
Budget option? The Momcozy hands-free bra is like fifteen bucks on Amazon. It’s not as durable or adjustable as pricier options but for occasional use or as a backup, it does the job.
You can also DIY a pumpin’ bra by cuttin’ holes in an old sports bra, but honestly, for thirty to forty bucks, just buy a real one. The fit and hold is better and you won’t be fussin’ with it constantly.
Some moms like havin’ two pumpin’ bras so one’s always clean. Totally reasonable if it fits your budget.
Also, make sure the bra works with your specific pump and flange size. Most are adjustable but if you’ve got particularly large or small flanges, double-check compatibility.
Replacement Parts: Valves, Membranes, and Duck Bills
These tiny parts are essential to your pump’s suction, and they wear out way faster than you’d think.
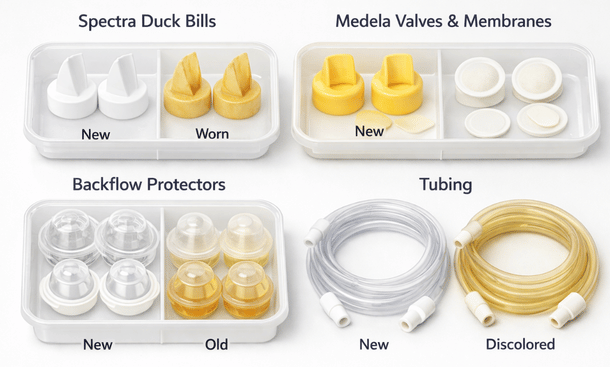
Valves, membranes, and duck bills—the exact terminology depends on your pump brand—are the small silicone pieces that create the suction and control milk flow. When they get stretched out, torn, or grimy, your pump loses suction even if the motor’s fine.
You’re supposed to replace these parts every four to eight weeks with regular use. In reality, some wear out in two weeks if you’re pumpin’ a lot. Keep extras on hand so you’re not panickin’ when your pump suddenly stops workin’ right.
These parts are cheap—usually five to fifteen dollars for a set. Buy a couple packs when you get your pump so you’ve got ’em.
Different pumps use different parts. Spectra uses duck bills and backflow protectors. Medela uses yellow valves and white membranes. Make sure you’re buyin’ the right ones for your specific pump model.
Name-brand parts are more reliable than generic knockoffs. Yeah, you can get cheaper versions on Amazon, but the quality’s inconsistent. Spendin’ an extra few bucks for official parts is worth it for peace of mind.
Store your spare parts somewhere clean and dry. A small ziplock bag or container works fine. Don’t just toss ’em loose in your pump bag where they’ll get dirty or lost.
Milk Storage Bags and Containers
If you’re buildin’ a freezer stash or pumpin’ at work, you need a way to store your milk.
Milk storage bags are the most common option. They’re disposable plastic bags designed specifically for breast milk. They’re pre-sterilized, take up minimal freezer space when laid flat, and you can write the date and amount right on the bag.
Lansinoh bags are the gold standard. They’re durable, the double zipper seal is reliable, and they come in six-ounce size which is perfect for most feeds. A box of fifty runs about fifteen dollars.
Medela bags are also popular and similarly priced. Some moms prefer one brand over the other based on the zipper design or how easy they are to pour from.
Budget brands like Target’s Up & Up or generic Amazon brands work fine too. I’ve used ’em without issues. The main risk with cheaper bags is occasional leaks, so don’t fill ’em to the very top.
For the most eco-friendly and budget-conscious option long-term, reusable containers work too. You can use regular baby bottles with tight lids, or dedicated breast milk storage bottles. The downside is they take up way more freezer space.
If you’re usin’ containers, make sure they’re BPA-free and designed for freezer use. Regular plastic containers can crack at freezer temps.
How many bags do you need? If you’re pumpin’ three times a day at work, that’s fifteen bags a week, sixty bags a month. Buy in bulk if you’re gonna be pumpin’ for a while.
Don’t reuse milk storage bags. Yeah, I know it seems wasteful, but they’re not designed to be washed and reused. The risk of contamination isn’t worth the couple bucks you’d save.
Cleaning Supplies That Actually Work
Keepin’ your pump parts clean is critical, but you don’t need to make it harder than it has to be.
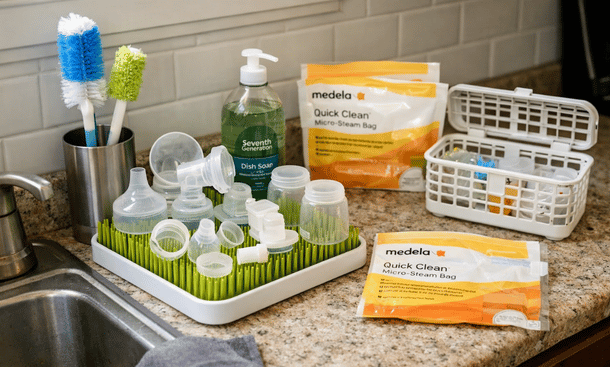
A good bottle brush set is essential. You need one with a regular brush for bottles and flanges, and a skinnier brush for gettin’ inside valve holes and narrow bottle necks. OXO makes a solid set for about ten bucks.
Dish soap is fine for daily washing. You don’t need special breast pump soap. Just use whatever you wash your dishes with, rinse thoroughly, and air dry.
Microwave steam bags like Medela Quick Clean bags are super convenient for sanitizing parts. You put your clean parts in the bag with a little water, microwave for a few minutes, and steam sanitizes everything. A pack of five bags lasts for twenty uses each, so you get a hundred sanitizing sessions for about ten bucks. Way easier than boilin’ water on the stove.
A drying rack specifically for pump parts keeps everythin’ organized and allows proper air flow. Boon Grass or similar designs work well. You don’t technically need this—layin’ parts on a clean towel works too—but it’s convenient.
Dishwasher baskets for small parts are clutch if you’re washin’ pump parts in the dishwasher. Otherwise valves and membranes fall through the rack or get blasted into oblivion by the water jets. A mesh bag or basket keeps everythin’ contained. A few bucks on Amazon.
Paper towels or a dedicated clean towel for dryin’ parts. Don’t use the same kitchen towel you dry your hands with—you want somethin’ clean specifically for pump parts.
Dish soap, brushes, steam bags, and a rack will run you maybe thirty to forty bucks total and last you through your entire pumpin’ journey.
Cooler Bags and Ice Packs for Milk Storage
If you’re pumpin’ away from home, you need a way to keep your milk cold until you can get it to a fridge or freezer.
A small insulated cooler bag with ice packs keeps milk safe for several hours. This is essential if you’re pumpin’ at work without fridge access, or if you’re pumpin’ on the go.
Medela makes a cooler set that comes with a small insulated bag and four ice packs for about twenty dollars. The bag fits four bottles, which is perfect for a workday.
Sarah Wells makes nicer-lookin’ cooler bags that don’t scream “breast milk” if discretion matters to you. They’re pricier, around forty to fifty dollars, but they’re well-insulated and look like regular lunch bags.
You can also just use any small cooler or insulated lunch bag you already have. Add some ice packs and you’re good. No need to buy somethin’ pump-specific if you’ve got somethin’ that works.
The key is havin’ enough ice packs that they stay frozen for your entire time away from home. If you’re gone eight hours, you might need more ice packs than what comes in a basic set. Buy a few extra.
Freeze your ice packs overnight so they’re ready to go in the mornin’. Keep extras in the freezer so you always have frozen ones available.
Breast milk is safe at room temperature for about four hours, in a cooler with ice packs for about twenty-four hours, and in the fridge for four days. Knowin’ these guidelines helps you plan your storage strategy.
Car Chargers and Battery Packs for Mobile Pumping
If you’re pumpin’ in your car—whether that’s in the parking lot at work, between errands, or durin’ your commute as a passenger—you need a power source.
Most electric pumps that plug in can also use a car charger. You plug it into your car’s 12V outlet, which used to be called the cigarette lighter, and pump while the car’s runnin’.
Check what kind of adapter your specific pump needs. Some pumps use standard AC adapters that work with universal car inverters. Others have specific car charger accessories you gotta buy from the manufacturer.
Medela and Spectra both sell car chargers for their pumps, usually around fifteen to twenty-five dollars. Worth every penny if you pump in your car regularly.
If your pump has a rechargeable battery, keep it charged and you don’t need a car charger. But batteries die at the worst times, so havin’ a backup power option is smart.
Portable battery packs are another option. Some pumps can charge via USB, which means you can use a portable phone charger battery pack to run your pump. This is great for pumpin’ in places where you don’t have an outlet or car available—like outdoor events, airplanes, or random locations.
Make sure any battery pack you use has enough power output for your pump. Pumps draw more power than phones do. Check your pump’s requirements and match it to a battery pack that can handle it.
Nipple Cream and Comfort Items
Pumpin’ can be rough on your nipples, especially in the early weeks or if you’re pumpin’ frequently.
Lanolin cream like Lansinoh or Earth Mama is the standard recommendation. It’s thick, moisturizing, and safe for baby so you don’t have to wipe it off before nursing. A tube costs about ten dollars and lasts forever because you only need a tiny bit.
If you’re sensitive to lanolin or prefer plant-based options, Earth Mama Nipple Butter works well. Coconut oil is also a cheap natural alternative.
Apply cream after pumpin’ and let your nipples air dry before puttin’ your bra back on when possible. Moisture trapped against your skin can cause irritation.
Hydrogel pads like Lansinoh Soothies provide instant cooling relief for sore or damaged nipples. You keep ’em in the fridge and they feel amazing when you’re hurtin’. They’re reusable for a few days and cost about ten to fifteen dollars for a pack.
If you’re dealin’ with serious nipple damage—cracks, bleeding, blisters—see a lactation consultant. That level of pain usually means somethin’s wrong with your flange fit or pump settings, not just normal wear and tear.
Breast shells or nipple shields are sometimes recommended for specific issues, but don’t buy these unless a healthcare provider tells you to. They’re not universal accessories everyone needs.
What You Don’t Actually Need
Now let’s talk about stuff that’s marketed to pumpin’ moms but isn’t really necessary.
Fancy designer pump bags. Your pump fits in a regular tote or backpack just fine. Don’t spend a hundred bucks on a bag that just holds your pump unless you really want it for aesthetic reasons.
UV sanitizers. These gadgets claim to sanitize pump parts with UV light. They’re expensive and no more effective than microwave steam bags or boiling water. Save your money.
Wipe warmers for flanges. Some people swear warm flanges help with letdown. Maybe, but you can just run your flanges under warm water before pumpin’. No need for a whole device.
Lactation supplements and teas. These aren’t accessories but they’re often sold alongside pump stuff. Most of ’em don’t have solid evidence behind them. If you’ve got supply issues, see a lactation consultant before throwin’ money at supplements.
Million different bottles and nipples. Your pump comes with bottles. Those are fine for collectin’ and storin’ milk. If baby develops a bottle preference later, you can buy different nipples then. Don’t stockpile six different brands preemptively.
Specialized pump cleaners and sanitizers. Regular dish soap works. Special breast pump soap is just expensive regular soap in different packaging.
Label makers for milk bags. Just use a sharpie. Nobody needs a dedicated label maker for this.
Assembling Your Starter Kit
If you’re gettin’ ready to start pumpin’ and you wanna stock up on essentials without breakin’ the bank, here’s what I’d recommend as a starter kit.
Must-haves: One extra set of flanges in your size, one hands-free pumpin’ bra, two packs of replacement valves and membranes, one box of milk storage bags, basic bottle brush set, microwave steam bags, cooler bag with ice packs, and nipple cream. Total cost is probably around a hundred to a hundred and fifty dollars.
Nice-to-haves if budget allows: Second pumpin’ bra, extra flange sizes to test fit, car charger for your pump, portable battery pack, drying rack for pump parts. Add another fifty to a hundred dollars.
Don’t buy everythin’ all at once. Start with the basics, see what you actually use and what you find yourself needin’, then add from there. Every mom’s pumpin’ experience is different and what’s essential for one person might be unnecessary for another.
Watch for sales. Target and Amazon frequently have deals on pumpin’ accessories. Stock up on storage bags when they’re on sale.
Accept hand-me-downs for some stuff. Unopened boxes of storage bags, never-used pump parts, gently used pumpin’ bras—all fine. Don’t accept used flanges, valves, or anything that touches milk directly unless it’s from someone you really trust and you’re gonna sanitize thoroughly.
Organizing and Storing Your Pump Gear
Havin’ all this stuff is great, but if it’s scattered all over your house you’re gonna lose your mind tryin’ to find what you need at 2 AM.
Designate a specific spot for pump stuff. A basket or bin that holds your pump, accessories, and cleaning supplies keeps everythin’ together. Keep it wherever you pump most often—bedroom, nursery, kitchen, wherever.
Pack a work bag the night before if you’re pumpin’ at work. Include your pump, pumpin’ bra, extra parts, storage bags, and cooler bag. Leavin’ anythin’ for the mornin’ when you’re rushin’ out the door is a recipe for forgettin’ critical items.
Keep backup parts and supplies at work if you’ve got a locker or dedicated space. That way if you forget somethin’ at home, you’re not screwed.
Store milk storage bags in the box they came in so they stay clean and organized. Don’t just toss loose bags in a drawer where they’ll get dusty or torn.
Label your pump parts if you’ve got multiple sets. A piece of tape with “Set A” and “Set B” helps you rotate through them evenly so one set doesn’t get way more worn than the other.
When to Replace and Restock
Knowin’ when to replace stuff saves you from pump failures at inconvenient times.
Valves and membranes every four to eight weeks with regular use. If you notice decreased suction before then, replace sooner.
Flanges when they crack, warp, or show visible wear. Hard plastic flanges can last months if you’re careful, but check ’em regularly for damage.
Tubing if you see condensation buildup that won’t dry out, discoloration, or mold. Closed-system pumps usually don’t need tubing replacement, but open systems do.
Pumpin’ bras when the elastic wears out and they’re not holdin’ flanges securely anymore. Usually several months to a year dependin’ on how often you wear and wash ’em.
Bottle brushes when the bristles get matted or fall out. Check every month or so.
Ice packs if they spring leaks or stop freezin’ solid. Shouldn’t happen often but it does sometimes.
Keep a runnin’ list of what you need to restock. When you use your last milk storage bag, add it to the list right then so you don’t forget to buy more.
Your Next Steps
Alright, you’re now set up with all the practical gear that’ll actually make pumpin’ work in real life. No fancy nonsense, just the stuff that keeps you functional and sane when you’re pumpin’ multiple times a day while jugglin’ everythin’ else.
Now that you’ve got your accessories sorted, it’s worth circlin’ back to make sure you fully understand all the different pump types and how they actually work in day-to-day use. If you started with accessories and you’re workin’ backwards to pick your actual pump, checkin’ out the complete breakdown of different types of breast pumps will help you understand which pump style pairs best with the accessories you’re investin’ in. And for the full picture of what pumps are actually worth your time and money this year, my comprehensive comparison guide to the best breast pumps available covers all the top models across every category so you can make the smartest choice for your situation and budget.

As a Felyro.com content author, I develop actionable content on breastfeeding, translating research-backed information into practical advice for mothers. My goal is to help families establish healthy feeding habits, improve maternal confidence, and support infant development.